
Back to the film (By Ilya Palopezhentsev (iliks/hugi))
Introduction
Let's suppose you've become interested in photography and decided to buy a digital camera. Nowadays it's very popular to have one; most people believe that 'digital' has won over 'film'. You could go either the cheap way and buy a compact camera or you could spend several thousand dollars to get a digital SLR camera.
But isn't it very pedestrian and mainstream, unoriginal and commonplace? So, if you are oldschool and hardcore enough, you have another option: you can dig in your attic and perhaps find a camera which your parents or their parents used something like 30 - 50 - 70 years ago! Why not to try to shoot with them? Often they would have quite good optics and build quality.
Of course, you can buy a new film camera, but I find this variant less appealing - you'll loose a certain charm of using old equipment. That magic feeling that the 50-year-old thing which worked fine in the good old times still works today and gives you great photos. Also, there's nothing like seeing interested expressions in the faces of passers-by when they see your 'apparatus'!
Surely, the old cameras may be harder to use than the new ones - but think, isn't it something like the demoscene, to get outstanding results with quite old equipment? Also, the old cameras don't have all those stupid automatics that only get in your way and do everything for you. Leaving everything for automatics is quite bad - first of all, machines make errors, and second - this way you will have less interest to learn the principles of photography and so you won't be even able to correct the parameters that automatics prepared for you!
This article isn't going to be a thorough photography course - there is plenty of information on the Internet you can always refer to (see the Links section). Instead, I will introduce you to some basic facts specific to film cameras and the film itself.
What you've got
So, let's suppose my introduction has made you wanting to try out some old stuff. You go to your basement and find a camera your relatives were using decades ago. The principles of photography are pretty similar for all sorts of photo equipment; however, you should determine the concrete type of what you've got in order to get a general idea about how to use it and where to find more information. The following sections describe several widespread camera types.
View cameras
First we have view cameras, the oldest camera type and in many respects still the most advanced one. They have a big size and are usually associated with the beginning of the photographic history. Their typical feature is that you behold the image you are to capture not using a small silly viewfinder, but a large, frame-sized ground glass - and the frame of such cameras is usually 9x12 cm or 4x5 inches or higher. The only drawback to this is that you see everything upside down, but that's a minor problem. Be sure, it's a great pleasure to look into this ground glass; you see the focusing so well that it's very painful to get back to 'normal' cameras with their tiny viewfinders.
There are two types of view cameras - monorail and folding cameras. Monorails are big boxes which cannot be folded. Folding ones, as you see from their name, allow one to fold it into small box when not used. The fig. 1 shows such a camera from the 1930's.
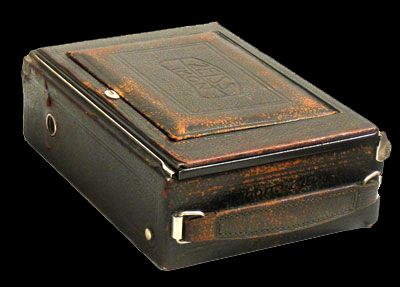 Fig. 1: Folding 1930' Zeiss Ikon Trona view camera (in folded state)
You press a button, make a couple of manipulations and voila - you have a big camera before you! (See Fig. 2.) It's very surprising how big the size difference between the folded and opened states is!
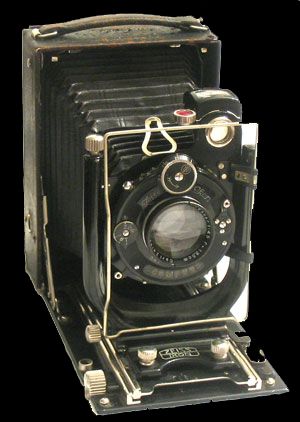 Fig. 2: The same camera in unfolded state
Such cameras take both glass plates and regular sheet film, which is still available for buying and processing. You can get very good results with this type of camera - if you find one, be absolutely sure to capture some majestic landscapes with it!
This type of cameras is for a thoughtful photographer who doesn't mind driving to some picturesque places, spending hours finding the shooting point and taking just several shoots. And then making everyone amazed by the results!
Rangefinder cameras
Rangefinder cameras were very widespread in the 30's - 60's. The first rangefinder was Leica, which is famous and sought after by collectors. A lot of firms around the world caught the idea and started to make their own modifications of the original Leica's design. The Soviet Union produced two lines of Leica clones - FED and Zorki. You can find them cheap (10-20$) and get quite a good quality camera. Or maybe you are lucky and have the Leica itself.
Rangefinder camera is very compact and visually attractive (see Fig. 3) ? it can easily be compared with modern cheap compact cameras in terms of size - but of course it's much better than those Chinese toys! Most of them have great optics and of course they are fully mechanical and give you a wide range of photographic possibilities.
 Fig. 3: 1956' Zorki-S rangefinder camera
What gives rangefinder cameras their name? They are called so because they have a built-in rangefinder - a device for determining distances between you and other objects. You need this in order to focus on your subject of interest so that in the photo it will appear sharp and all the rest will appear blurred to a certain degree. Using the rangefinder is very simple - you look into one of two small viewfinders on the back of the camera. It shows you two imposed images of what you see. By rotating the lens focus ring you match two images in one. After you've done it, the camera is focused properly. The second small viewfinder is used to actually compose the scene - it shows what you will get on the film. Note that it doesn't have any optic connection with the main lens - so you see a slightly different image than the lens sees. This will create troubles with close-up photography. Later rangefinders have just one viewfinder instead of two. You focus and compose using one window.
The rangefinder was a revolutionary camera for its time - for the first time the camera was very portable and almost instantly usable.
Note that rangefinders have some peculiarities and you must read some rules about their use before actually using them - or else you can easily damage your camera. Especially remember that many rangefinders require you to cock the shutter first and set the shutter speed only after that; failure to do so leads to mechanic damages. See [1] for more information.
Here's what rangefinder is able to do:
 Fig. 4: Kiev-4 camera, Fuji Velvia 100 film
SLR cameras
Another type of cameras is Single Lens Reflex (SLR) cameras. The feature that defines them is that what you see in the viewfinder is what you will get on the film - and this doesn't depend on what kind of lens you set on it. This makes using a lot of different lenses easy. And basically that's it. The camera gives you that ability by using a mirror and a prism which gets light from the main lens and leads it into your eyes watching into the viewfinder.
Compared with rangefinders, using SLR's you pay the price of increased size and weight and harder manual focusing - if you don't have perfect sight, precise manual focusing will be very hard while with rangefinders you can focus easily even without glasses (if you wear them)! Luckily, SLR's from 80's-90's already have automatic focusing systems.
Some people think that if a camera is SLR then it will magically give oustanding image quality. It's not so - you can get the same quality with a rangefinder camera and do note that some types of lenses give higher quality in their rangefinder designs (wide-angle lenses).
If you ask me, I prefer fully mechanic cameras still - they are very durable, you don't have worry about charging batteries etc. And of course you get that magical feeling of being old school! Fig. 5 depicts a typical mechanic SLR camera.
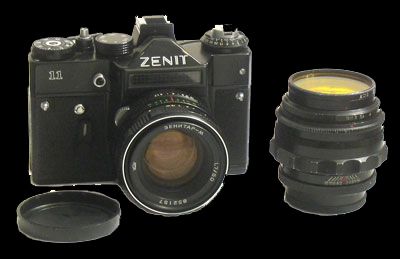 Fig. 5: 1982' Zenit-11 Single Lens Reflex camera with an interchangeable lens to the right
 Fig. 6: Taken with Zenit-11, Fuji Superia Reala 100 film
Medium format cameras
Medium format cameras take images on standard type 120 film. It is still sold in serious photo shops. This type of film can accomodate a number of image formats with frame dimensions 6x6cm, 6x4.5cm, 6x7cm, and 6x9 cm.
Medium format cameras take good features from large format cameras as well as from small 35mm film cameras. Often they have a ground glass like in large format cameras (though it's smaller and is at the top). Big frame size allows to capture a great number of details. At the same time they are more compact than large format cameras and you can take shots without tripod.
There are different types of medium format cameras, both SLR's and rangefinders. At the moment I don't have a medium format SLR, but I have a rangefinder from 1960's (Fig. 7). Like that Zeiss Ikon camera, its central part folds inside the body when you don't shoot. This makes it even more compact than many small format SLR's.
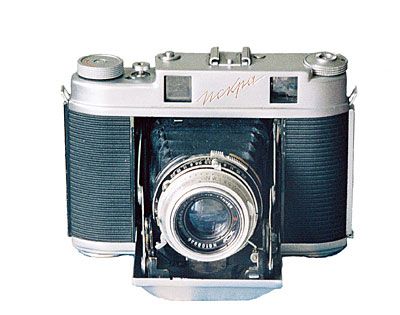 Fig. 7: Iskra medium format folding camera
Medium format film is convenient to use because it is big enough so you can scan it with regular desktop scanners like Epson 4990 (scanning small format film on that scanners gives bad results because of small scanner resolution)
What you can get with medium format camera:
 Fig. 8: Taken with Iskra and Fuji Velvia 100 film. Scanned with consumer Epson 4490 desktop scanner
In Fig. 8 you can see what amount of detail you can get with medium format (see at the black frames). The picture was scanned to 29 megapixels with consumer-level Epson 4490 desktop scanner, so professional equipment will extract more sharpness and detail.
Other camera types
There are some more camera types apart from the ones listed above. But most of the time, they are inferior to these two types so you probably shouldn't bother with them. Or perhaps you should - if you are a hardcore oldschooler!
Notions to learn if you decide to start
As I said, I have no intentions to make this article be a complete photography course. So if you are completely new to photography, you will have to find and learn some notions yourself. I give you a brief list of what you should know in order to successfully use old-time cameras and also include corresponding Internet links:
- Shutter speed (http://en.wikipedia.org/wiki/Shutter_speed) - Aperture (http://en.wikipedia.org/wiki/Aperture) - Exposure (http://en.wikipedia.org/wiki/Exposure_%28photography%29) - Exposure metering (http://en.wikipedia.org/wiki/Exposure_Meter) - Focus (http://en.wikipedia.org/wiki/Focus_%28optics%29) - Focal plane (http://en.wikipedia.org/wiki/Focal_plane) - Depth of field (http://en.wikipedia.org/wiki/Depth_of_field) - Focal length (http://en.wikipedia.org/wiki/Focal_length)
Film Basics
I do not explain some basic terms here, but let's cover the topic of film to see the advantage over digital. A film camera is nothing without a film. You see, in a digital camera you have a built-in sensor, which can be used to capture almost any number of photos without maintenance (oh yeah, in digital SLR's you have to clear it from dust :). You cannot replace the sensor to your liking, though. A film could be equaled to 'removable sensor', which is for one-time use only. And what is great about film, you can use different kinds of film for different tasks. With a cheap film you can make your great camera produce cheap photos, with a great film you can produce terrific images even on a so-so camera. And if a film manufacturer improves its film, your next photos will improve automatically, without replacing the camera.
We need to introduce three parameters of the film: dynamic range, noise, and sensitivity.
Dynamic Range
The dynamic range (or photographic latitude) of film is the range of luminance levels the photo-sensitive medium can store without 'overloading' or 'underloading'. I'm simplifying the definition so it is more accessible. What does this parameter mean in practice? The bigger dynamic range your medium (film or sensor) has, the more contrast scenes you can capture without losing details in highlights and shadows.
To understand this better, imagine the following picture. You stand at the mountain and see its dark surface around you. Then you look higher and see the perfectly blue sky and the Sun. You decide to make a photo which would contain all of the following: the dark surface of the mountain, the sky and the Sun. You press the shutter release button - and get a bad shot. The reason: you tried to capture on imperfect medium a scene which has extreme variations in luminance (brightness). The luminance of the ground in shade is billions times higher than that of the sky. What will you get on your shot? Most probably you will get an almost white sky instead of a blue one and an even brighter hole instead of the sun - all gradual brightness changes will be lost. Or, even if you get a decent sky, the ground will lose all its details - it will become completely black. You see, the dynamic range of the medium was too small for capturing the scene.
Now you have an idea what dynamic range means. And if you've followed my advice and chosen film photography, you are lucky - film has a far better dynamic range than most of professional digital cameras! This means you will be able to shoot very beautiful landscapes involving the sunsets without turning the Sun into the white hole; this means you will be able to shoot in rooms with incandescent lights in the scene without worrying that they will turn to completely white spots etc.
I've prepared a small presentation of difference between dynamic range of film and of digital sensor.
First we have two shots of winter sky with the Sun behind the clouds. Look at the Fig. 9. The photos were shot with identical exposures.

 Fig. 9: Dynamic range illustration.
Left: film (Fujifilm Superia 200 consumer film).
Right: Canon PowerShot A60 consumer digital camera.
Fig. 9: Dynamic range illustration.
Left: film (Fujifilm Superia 200 consumer film).
Right: Canon PowerShot A60 consumer digital camera.
You see, the left image (made using a film camera) has much more highlight details than the right one made using a digital camera. You clearly see parts of the clouds even in the center of the left image. The area is not white either, while the right one has one big ugly white hole. If you look at it with Photoshop's eyedropper you will notice that all pixels have maximum values (255,255,255) meaning there's no useful information at all in that hole. Looking with Photoshop at the left image shows us that the center is not completely white, it has pixels with slightly varying colors. Note that both the film and digital camera were consumer ones, so we are not comparing a plastic knife with the silver one.
Here we come to another impressive example of film's dynamic range. I pointed both film and digital cameras at the incandescent lamp and here's what I've got (remember the exposure parameters were completely equal so both cameras captured the same amount of light):
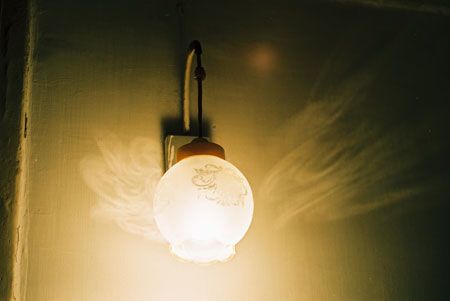 Fig. 10: Film dynamic range illustration (Fujifilm Superia Reala 100 film)
 Fig. 11: Digital camera dynamic range illustration (Canon PowerShot A60 camera)
Notice that the film shot has fine details not only in highlights but in the shadows too (look at the fine details on the wall). Now let's magnify the bulb portion of the image:
 Fig. 12: Film dynamic range illustration (magnified)
 Fig. 13: Digital camera dynamic range illustration (magnified)
Notice you can see the actual glass bulb in the film shot! (Fig. 12) You can do it with your eyes too, watching at the bulb directly (the lamp is not very bright). But the digital sensor cannot catch it! (Fig. 13)
So now you see the film has a big advantage over a digital sensor in terms of dynamic range. And don't say the digital performed so bad because I used very cheap consumer camera ? I saw images taken with expensive digital cameras (1000$, 2000$, ...) and they have better performance but still not close to the film you can buy for 3$.
Noise
Noise is a more obvious thing. Unlike dynamic range, digital cameras are better in this aspect than most films. Do note, however, that film noise has a different structure than that of digital sensors: it's more monochromatic, film noise is more of a variance of brightness of one color, while the noise of a digital sensor usually consists of 'bursts' of other colors. In the Fig. 14 you can see the difference. The first two photos were captured on consumer negative film, while the third one was taken with Canon PowerShot A60 consumer digital camera (notice 'blue' spots on the brown main tone).


 Fig. 14: Film noise
Left: Fujifilm Superia 200 film
Center: Fujifilm Superia Reala 100 film
Right: Canon PowerShot A60 sensor
Fig. 14: Film noise
Left: Fujifilm Superia 200 film
Center: Fujifilm Superia Reala 100 film
Right: Canon PowerShot A60 sensor
Sensitivity
We get photographic images by letting the light fall on the light-sensitive material for some time period. Here one question arises - how long will it take for the image to get onto the film, or how long should the material be opened for the light? First of all, this depends on the shutter speed and aperture settings of your camera. However, there's one more parameter which contributes to this - film sensitivity. Different kinds of films have different sensitivities and therefore need less exposure time (or less light) to achieve 'normal' brightness of the frame.
Nowadays, the sensitivity is measured in ISO units. Most commonly you'll encounter films that have sensitivity equal to 100, 200, or 400 ISO. The higher the ISO rating is, the less time film should be exposed to light in order to get the same image. For example, if you need shutter speed of 1/500 to get some image with 200 ISO film, you'll need twice long shutter speed of 1/250 to get the same image captured with the 100 ISO film.
For good lighting conditions it is advisable to use 100 ISO film - it has less grain so you'll get 'better' images. Nowadays 400 ISO film is often positioned as the 'best', universal choice and it even costs higher - but use it only when you have to shoot indoors or with bad lighting conditions etc - it has bigger grain than 100 ISO.
Now that we know some non-obvious parameters, let's get to some details on types of film. Basically, there are two of them: negative (print) and slide (positive) film. Negative film is for everyday use; slide one allows you to get professional results (though, of course, to get an artistic masterpiece you'll have to have a lot more than a good film - something like good ideas in your head, for example).
Negative (print) film
That's the film everybody is used to - and it is what the majority of stores sell. Probably you know its principle - it captures light objects as dark spots and dark objects as white spots. Inversion of the negative takes place during printing.
Pros:
+ Wide availability of the film itself and its processing services (developing, printing)
+ Wide dynamic range
+ Can be stored undeveloped in any location and for a long time (about a year)
Cons:
- Low resolution (number of megapixels). Regular consumer 35mm film has about 6-8 megapixels.
- High noise level
Slide film
This film is less available (most stores do not sell it due to low consumer interest) but gives better picture quality. Slide film is developed by another process than the negative film so not every minilab can develop it. The main feature of slide film is that you get a miniature life-like image on it, there is no colors inversion. You can project it on a wall with a projector. Of course, other options are available - e.g. scanning.
Pros:
+ Great colors - the best sorts of slide film can show more colors than your good CRT monitors (not even talking about LCD's...)
+ Low noise.
+ Great resolution (the best sorts of slide film have about 16 megapixels for standard consumer 35mm format. Equivalent digital sensors cost very much).
Cons:
- Not very widespread in stores and not all laboratories develop it and print images from it.
- Dynamic range is lower than that of the negative film
- Undeveloped, it should be stored in a fridge; it should be developed as soon as possible after shooting (if undeveloped for too long time, the film will get wrong colors)
Post-processing
After you get your film developed, it is time to decide what path to choose for the next steps: analog or digital. If you select the analog way, you have few options except to bring your film to the nearest minilab and order to print it. If you select the digital way, you first scan the film, (optionally) process it in image editing software to enhance the look or get rid of any defects, and then use digital printing in the same nearest minilab.
I find the second way more appealing - you can remove some scratches and noise, correct colors and get a better looking image.
Scanning the film allows you to get regular digital images which you can edit, publish on the Web, send to friends etc.
There are several ways you can scan film nowadays. First, some regular scanners have a special mode for scanning the film. This is the cheapest solution and gives the lowest quality.
The second method is using 'regular' film scanners. These are special scanners which were built specifically for scanning the film and can't be used for anything except that. They give much better quality than regular consumer scanners.
The third method is drum scanners. Drum scanners have very good image quality and very big resolution. They are very expensive for an individual to have (tens of thousands dollars), so usually you just buy the scanning service.
Actually, there's the fourth method of getting digital image, but I don't count it as significant. I mean scanning printed images using regular office scanners. This gives the least possible quality of all the four methods.
Most scanners can scan in JPEG or in TIFF image file formats. Of course, it is always better to choose TIFF, because it uses lossless compression. Often, it would also have higher number of bits for each color channel, e.g. 12 instead of JPEG's 8. This means you give yourself some headroom for additional editing.
Note: Before giving film for printing or scanning, watch it closely to make sure there are no water spots left on it after developing - it happens from time to time. Otherwise, in case of printing, you'll get defective print, and you won't be able to do anything with it. In case of scanning, you'll get defective digital image and only if you are lucky will you be able to mask the defects in software.
Ah, and we forget one thing - black & white film processing at home! I guess in the future, when mean digital cameras take all the film away this will be the one possible way to shoot with the film - black & white film is easier to make and some new manufacturers of it will surely arise to fill the niche.
The FUTURE of film
Unlike what biased mass media says (remember they have to sell new models), the film has a future. It's a popular belief that digital cameras displaced film. Digital cameras replaced film only in consumer market and only part of professional photography (mainly newspaper & magazine reporters). Artistic photography (and some other forms, e.g. advertising photography) is still film based and will be for a long time.
Why? Dynamic range and resolution. These are areas digital has not surpassed film and will not surpass for at least 10-20-50 years, I don't know. Dynamic range is very important for taking sunlit landscapes, for capturing face skin tones etc. Try to capture the Sun with your digital camera ? you will get a white 'hole' and that is all you will get. Ok, there are some approaches to simulate this in digital cameras, e.g. in some of Fujifilm digital cameras. But they are not 'there' yet. And still, even if they manage to achieve equal dynamic range with film, they have much tougher barrier on their way: resolution.
In mass thinking, a 'film camera' is a consumer camera taking 35mm film. Currently, the frame on such a format of film can store about 16 megapixels (in best cases). The best digital cameras came close to this, indeed. However, there are two other formats of film cameras: medium format and large format!
Medium format cameras can be quite similar to regular ones. But they take film of another type; each frame on this film is of 6x6 or 6x9 cm. As you can guess, the larger the frame size, the higher the resolution.
Large format cameras (or view cameras) are ones that most of people associate only with the past - relatively big rectangular boxes on tripods. But they are alive and doing well! They have frames of 9x12 cm and higher. They are used in landscape and advertising photography.
So, can you guess how many megapixels can medium or large format frame store? The medium format film can store up to 50 megapixels (for the best sorts of film available today). The large format film can store up to 200 megapixels (for the best sorts of film available today)!!! Yes, you read it right: 50 and 200! And they do it NOW, the very same time you go buying 10 megapixels digital camera for several thousand dollars and thinking how great it is that digital has won over film!
You can be pretty much sure the situation won't change at all in the future decades. Like big LCD monitors, big digital sensors are very expensive to manufacture because the higher the pixel count is the bigger is the probability that some pixel will be 'dead' and you will have to throw this matrix into the recycle bin. Some professional 30 megapixel sensors cost dozens of thousands dollars! With film it's different: it's not harder to cover bigger surface with the emulsion! You just spread it among bigger area, like you spread butter on your toast. And 200 megapixels film frame costs just dollars (about 2$)!
Conclusion
So, that was a quick story of some camera types and advantages you get with using the film. It's all well, but always remember that the biggest impact on the artistical quality of your photos is caused by your mind, not the equipment. Film cameras provide you with excellent opportunity to shoot slowly and thoughtfully - use it to better your talent!
Links
http://www.jay.fedka.com/ Describes working with Soviet Leica clones, Fed & Zorki. Note that almost everything applies to the original Leica as well.
http://www.rangefinderforum.com/ Great forum & gallery resources for photographers using rangefinder cameras. I was pleasantly surprised by the friendliness of the forum community.
www.largeformatphotography.info Good resource for view camera users
http://normankoren.com/#Tutorials Very good site, which has excellent deep articles on photography, including scientific comparisons of film and digital.
www.clarkvision.com Another site which is very similar to the previous one and of course equally interesting to read.
http://www.kenrockwell.com This site has the same broadness of two previous links, but its main feature is that everything is explained in simple terms and strict comparisons are intentionally not made - the author's position is that you have to judge everything by your eyes.
Appendix. Small Tips
If camera scratches film, remove it manually
If you use quite old cameras, they could leave hard scratches on film which will be very visible on final photos. It's hard to say what is their cause - probably the film in the old times was more enduring or probably the mechanics has got too tight or become dirty over all those years.
But anyway, what to do if you notice such thing with your camera? First, you can correct this with Adobe Photoshop after scanning, the "Healing Brush Tool" comes very handy at this. Read the manual for explanation how to use it. However, this method is useful only if the scratch goes mostly over uniformly lit areas without fine details.
The second way is to take care when you shoot and remove the exposed film. When you advance the film for the next shot, cock the shutter very carefully and slowly. This way the film won't be damaged. Next, the reverse winding of the film back to the cassette after exposing it sometimes is too stiff; the film gets scratched in tight cavity of the camera. If you have a suspicion this could be the case, you should bypass camera's reverse winding and remove the film yourself. Go to the dark bathroom or any other room without any light, open the camera, take out the cassette out of it and start to slowly insert the film back to the cassette. You can sacrifice some cheap film to practice this in light so you feel comfortable doing it blindly.
Too much suffering for simple shots? Remember, the artist must suffer.
Use simple compact digital camera as exposure meter
Many old small & medium format cameras (and all view cameras) are fully mechanic - they do not have any batteries, electronics etc. This can be quite good - you don't have to charge it, you can take photos in poorer conditions etc. However, there's one thing, which can create obstacle for beginner photographer - they are not automated. You have to set exposure parameters judging by your eyes or you have to buy a separate exposure meter and transfer its parameters to the camera controls before each shot.
There's a nice little trick here. If you already have digital camera (even a cheap one will do), you can use it as the exposure meter and save some money! It's very easy: set the ISO sensitivity of your digital camera equal to sensitivity of your film, point the digital camera to the scene you are taking and press the shutter release button halfway. Most cameras will calculate current exposure parameters and show them on their screen. After this, you can transfer these numbers to the controls of your film camera.